Introduction to Terraform
HashiCorp’s Terraform tool allows users to describe their infrastructure as a code (hence the name of “Infrastructure as Code” or IaC) and deploy it to either cloud or on-premises resources. Terraform can manage both low-level (compute, storage, networking, etc.) and high-level components (DNS, SaaS, etc.) of the infrastructure resources.
In this blog, I will introduce you to terraform, so you will have a good foundation for getting started..
terraform Installation
terraform is a binary file that can be downloaded from this link. After downloading the pre-compiled file, it needs to be placed in a special folder where other executables are located, so the system knows how to find it.
HashiCorp also provides other ways to install terraform onto your system. Here some examples:
MacOS X
NOTE
Machine has to havebrewinstalled on it before proceeding. For more information on how to install homebrew take a look here.$ brew tap hashicorp/tap $ brew install hashicorp/tap/terraform $ brew update $ brew upgrade hashicorp/tap/terraform
Windows
NOTE
Machine has to havechocoinstalled on it before proceeding. For more information on how to install chocolatey take a look here.choco install terraform
Linux (Ubuntu/Debian)
$ sudo apt-get update && sudo apt-get install -y gnupg software-properties-common curl
$ curl -fsSL https://apt.releases.hashicorp.com/gpg | sudo apt-key add -
$ sudo apt-add-repository "deb [arch=amd64] https://apt.releases.hashicorp.com $(lsb_release -cs) main"
$ sudo apt-get update && sudo apt-get install terraform
Linux (Red Hat/CentOS/Fedora)
$ sudo yum install -y yum-utils
$ sudo yum-config-manager --add-repo https://rpm.releases.hashicorp.com/RHEL/hashicorp.repo
$ sudo yum -y install terraform
Now that you have installed the terraform, validate that it is working as expected. For that use the terraform -help or terraform -version command
$ terraform -version
Terraform v1.1.9
on linux_amd64
$ terraform -help
Usage: terraform [global options] <subcommand> [args]

The available commands for execution are listed below.
The primary workflow commands are given first, followed by
less common or more advanced commands.

Main commands:
  init          Prepare your working directory for other commands
  validate      Check whether the configuration is valid
  plan          Show changes required by the current configuration
  apply         Create or update infrastructure
  destroy       Destroy previously-created infrastructure

All other commands:
  console       Try Terraform expressions at an interactive command prompt
  fmt           Reformat your configuration in the standard style
  force-unlock  Release a stuck lock on the current workspace
  get           Install or upgrade remote Terraform modules
  .
  .
  .
<Omitted for brevity>
As a final step of the installation issue the terraform -install-autocomplete command to install the autocomplete package. This is a very helpful package for the beginners since it auto completes valid terraform CLI commands when Tab is pressed.
NOTE
The shell needs to be restarted after the package is installed.
terraform CLI
terraform CLI has a lot of available commands that can be used to achieve certain tasks, but in this blog I will cover only six of them. The table below will summarize each command’s purpose.
| Command | Description |
|---|---|
| init | Initializes the working directory containing the new Terraform configuration file. This is the first command that should be run. |
| validate | Validates the configuration files in a directory without executing the actual code. |
| plan | Creates an execution plan, which allows the user to see the changes that Terraform plans to make to the infrastructure. |
| apply | Executes the Terraform code and either creates or updates the infrastructure. |
| destroy | Destroys all remote objects managed by a particular Terraform configuration. |
| fmt | Rewrites the Terraform configuration files to a canonical format and style. |
We will see the commands in action later.
terraform HCL
HashiCorp developed and actively uses a special configuration language called HashiCorp Config Language (HCL) for all their products (Terraform, Vault, Consul, etc.). The reason HashiCorp created it is to address the limitation that JSON currently has (unable to make comments). More information on HCL and the reason behind creating a new language can be found at this GitHub repo.
NOTE
Terraform supports code that is writted in JSON. All you have to do is to use a.tf.jsonfile extension when creating a new file.
Now, let’s talk about HCL syntax. The image below summarizes the syntax structure that HCL understands.
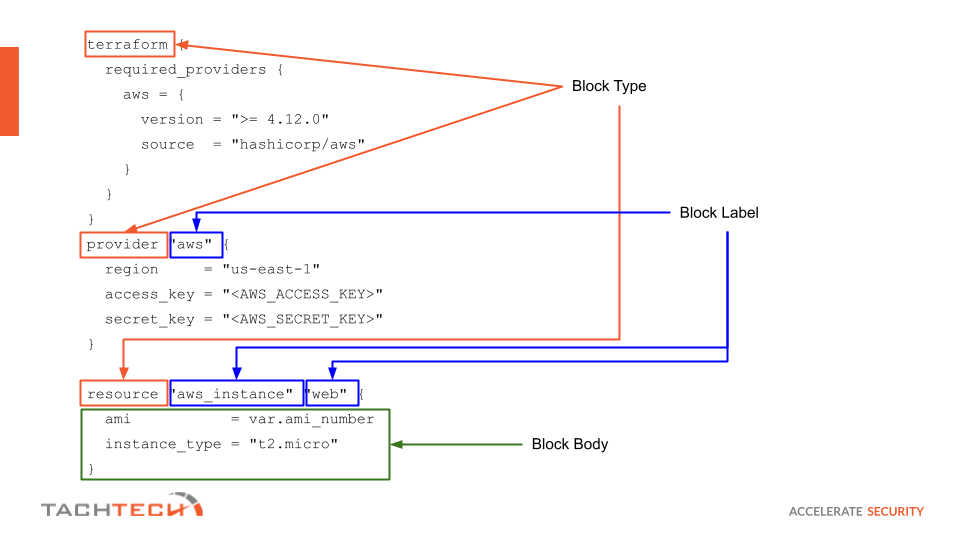
An explanation of each element can be found below.
| HCL Code Element | Description |
|---|---|
| Block | The block of code that is ment to achive something when terraform is executed. |
| Block Type | Block type tells terraform what type of a resource will be executed. Commonly used block types are provider, resource, data, output, variable, etc. |
| Block Label | Block type might require one or more block labels. |
| Block Body | All code encapsulated between { and } is considered a block body. The block body might also contain other blocks in it. |
| Argument | Argument assigns a value to a paricular name. |
Let’s talk about the block types now, since they are the moving force of Terraform. In this blog I will cover the most commonly used ones. The table Below should summarize the block types that you will definitely come across.
| Block Type | Description | Block Labels |
|---|---|---|
terraform |
Configures some behaviors of Terraform itself. | None |
provider |
Tells terraform how to interact with the infrastructure’s APIs. |
1 |
resource |
Provisions or updates a specific object of the infrastructure. | 2 |
data |
Gets data from a specific object of the infrastructure that already exists. | 2 |
variable |
Helps to define custom variables in Terraform code. | 1 |
output |
Returns customizable information that can be used in the other parts of the Terraform code. | 1 |
Some examples of each block type
terraform
Sets the minimum aws provider to the 2.7.0 version.
terraform {
  required_providers {
    aws = {
      version = ">= 2.7.0"
      source = "hashicorp/aws"
    }
  }
}
provider
Tells the aws provider to use us-east-1 as the region.
provider "aws" {
  region = "us-east-1"
}
resource
Uses aws_instance resource labeled web to create a new AWS instance.
resource "aws_instance" "web" {
  ami           = "ami-a1b2c3d4"
  instance_type = "t2.micro"
}
data
Uses aws_ami data source labeled app_server_ami to the retrieve a particular AMI identifier from the AWS.
data "aws_ami" "app_server_ami" {
  most_recent = true

  owners = ["self"]
  tags = {
    Name   = "app-server"
    Tested = "true"
  }
}
variable
Creates a mandatory variable labeled image_id with the type of string.
variable "image_id" {
  type = string
}
output
Shows only the private IP information obtained by the aws_instance resource.
output "instance_ip_addr" {
  value = aws_instance.server.private_ip
}
NOTE
This is an introductory blog, so some information is covered on the surface (variables, data types, etc.), but, in future blogs, I will cover these topics in more depth.
Hands-On with terraform
It’s time to put everything we’ve learned so far into action and see how it works.
Let’s take a look at our folder and see what it contains and what the contents of each file are.
$ tree
.
└── main.tf
As you can see we only have one file called main.tf. In reality, we could have named this file anything as long as the extension ends with .tf Terraform will understand that this file needs to be read and executed.
Let’s take a look at its contents:
$ cat main.tf
terraform {
required_providers {
aws = {
version = ">= 4.12.0"
source = "hashicorp/aws"
}
}
}

provider "aws" {
region = "us-east-1"
access_key = "<ACCESS_KEY>"
secret_key = "<SECRET-KEY>"
}

variable "ami_number" {
type = "string"
default = "ami-0f9fc25dd2506cf6d"
}

resource "aws_instance" "web" {
ami = var.ami_number
instance_type = "t2.micro"
}
First things first, let’s address the elephant in the room; the code looks horrible since it is not formatted properly (relax it is intentional :)). If you recall, I said that we will use the terraform commands when the time comes. Well, it is that time. We can fix the formatting by simply issuing the terraform fmt command and immediately checking the results.
$ tf fmt
main.tf
$ cat main.tf
terraform {
  required_providers {
    aws = {
      version = ">= 4.12.0"
      source  = "hashicorp/aws"
    }
  }
}

provider "aws" {
  region     = "us-east-1"
  access_key = "<ACCESS-KEY>"
  secret_key = "<SECRET-KEY>"
}

variable "ami_number" {
  type    = string
  default = "ami-0f9fc25dd2506cf6d"
}

resource "aws_instance" "web" {
  ami           = var.ami_number
  instance_type = "t2.micro"
}
Time to initialize our Terraform environment. For that, we will need to issue the terraform init command.
$ terraform init

Initializing the backend...

Initializing provider plugins...
- Finding hashicorp/aws versions matching ">= 4.12.0"...
- Installing hashicorp/aws v4.12.1...
- Installed hashicorp/aws v4.12.1 (signed by HashiCorp)

Terraform has created a lock file .terraform.lock.hcl to record the provider
selections it made above. Include this file in your version control repository
so that Terraform can guarantee to make the same selections by default when
you run "terraform init" in the future.

Terraform has been successfully initialized!

You may now begin working with Terraform. Try running "terraform plan" to see
any changes that are required for your infrastructure. All Terraform commands
should now work.

If you ever set or change modules or backend configuration for Terraform,
rerun this command to reinitialize your working directory. If you forget, other
commands will detect it and remind you to do so if necessary.
If you check the folder now you should notice a new folder named .terraform and a file named .terraform.lock.hcl. The .terraform folder contains the specified provider’s execution binary file and .terraform.lock.hcl has hashes to validate the provider’s binary file.
$ tree -a
.
├── .terraform
│   └── providers
│       └── registry.terraform.io
│           └── hashicorp
│               └── aws
│                   └── 4.12.1
│                       └── linux_amd64
│                           └── terraform-provider-aws_v4.12.1_x5
├── .terraform.lock.hcl
└── main.tf
Great! We are ready to plan our Terraform execution. Issue the terraform plan command and observe what the changes will be made to your infrastructure.
$ terraform plan

Terraform used the selected providers to generate the following execution plan. Resource actions are indicated with the following symbols:
  + create

Terraform will perform the following actions:

  # aws_instance.web will be created
  + resource "aws_instance" "web" {
      + ami                                  = "ami-0f9fc25dd2506cf6d"
      + arn                                  = (known after apply)
      + associate_public_ip_address          = (known after apply)
      + availability_zone                    = (known after apply)
      + cpu_core_count                       = (known after apply)
      + cpu_threads_per_core                 = (known after apply)
      + disable_api_termination              = (known after apply)
      + ebs_optimized                        = (known after apply)
      + get_password_data                    = false
      + host_id                              = (known after apply)
      + id                                   = (known after apply)
      + instance_initiated_shutdown_behavior = (known after apply)
      + instance_state                       = (known after apply)
      + instance_type                        = "t2.micro"
      + ipv6_address_count                   = (known after apply)
      + ipv6_addresses                       = (known after apply)
      + key_name                             = (known after apply)
      + monitoring                           = (known after apply)
      + outpost_arn                          = (known after apply)
      + password_data                        = (known after apply)
      + placement_group                      = (known after apply)
      + placement_partition_number           = (known after apply)
      + primary_network_interface_id         = (known after apply)
      + private_dns                          = (known after apply)
      + private_ip                           = (known after apply)
      + public_dns                           = (known after apply)
      + public_ip                            = (known after apply)
      + secondary_private_ips                = (known after apply)
      + security_groups                      = (known after apply)
      + source_dest_check                    = true
      + subnet_id                            = (known after apply)
      + tags_all                             = (known after apply)
      + tenancy                              = (known after apply)
      + user_data                            = (known after apply)
      + user_data_base64                     = (known after apply)
      + user_data_replace_on_change          = false
      + vpc_security_group_ids               = (known after apply)

      + capacity_reservation_specification {
          + capacity_reservation_preference = (known after apply)

          + capacity_reservation_target {
              + capacity_reservation_id                 = (known after apply)
              + capacity_reservation_resource_group_arn = (known after apply)
            }
        }

      + ebs_block_device {
          + delete_on_termination = (known after apply)
          + device_name           = (known after apply)
          + encrypted             = (known after apply)
          + iops                  = (known after apply)
          + kms_key_id            = (known after apply)
          + snapshot_id           = (known after apply)
          + tags                  = (known after apply)
          + throughput            = (known after apply)
          + volume_id             = (known after apply)
          + volume_size           = (known after apply)
          + volume_type           = (known after apply)
        }

      + enclave_options {
          + enabled = (known after apply)
        }

      + ephemeral_block_device {
          + device_name  = (known after apply)
          + no_device    = (known after apply)
          + virtual_name = (known after apply)
        }

      + maintenance_options {
          + auto_recovery = (known after apply)
        }

      + metadata_options {
          + http_endpoint               = (known after apply)
          + http_put_response_hop_limit = (known after apply)
          + http_tokens                 = (known after apply)
          + instance_metadata_tags      = (known after apply)
        }

      + network_interface {
          + delete_on_termination = (known after apply)
          + device_index          = (known after apply)
          + network_card_index    = (known after apply)
          + network_interface_id  = (known after apply)
        }

      + root_block_device {
          + delete_on_termination = (known after apply)
          + device_name           = (known after apply)
          + encrypted             = (known after apply)
          + iops                  = (known after apply)
          + kms_key_id            = (known after apply)
          + tags                  = (known after apply)
          + throughput            = (known after apply)
          + volume_id             = (known after apply)
          + volume_size           = (known after apply)
          + volume_type           = (known after apply)
        }
    }

Plan: 1 to add, 0 to change, 0 to destroy.

───────────────────────────────────────────────────────────────────────────────────────────────────────────────────────────────────────────

Note: You didn't use the -out option to save this plan, so Terraform can't guarantee to take exactly these actions if you run "terraform apply" now.
As we can see from the output, Terraform is planning to add one object (AWS EC2 instance) to our infrastructure. To actually make the change, issue the terraform apply command and type yes when prompted.
NOTE
This step might be costly to you or your company. Please, make sure you validate everything before running the code!
$ terraform apply

Terraform used the selected providers to generate the following execution plan. Resource actions are indicated with the following symbols:
  + create

Terraform will perform the following actions:

  # aws_instance.web will be created
  + resource "aws_instance" "web" {
      + ami                                  = "ami-0f9fc25dd2506cf6d"
      + arn                                  = (known after apply)
      + associate_public_ip_address          = (known after apply)
      + availability_zone                    = (known after apply)
      + cpu_core_count                       = (known after apply)
      + cpu_threads_per_core                 = (known after apply)
      + disable_api_termination              = (known after apply)
      + ebs_optimized                        = (known after apply)
      + get_password_data                    = false
      + host_id                              = (known after apply)
      + id                                   = (known after apply)
      + instance_initiated_shutdown_behavior = (known after apply)
      + instance_state                       = (known after apply)
      + instance_type                        = "t2.micro"
      + ipv6_address_count                   = (known after apply)
      + ipv6_addresses                       = (known after apply)
      + key_name                             = (known after apply)
      + monitoring                           = (known after apply)
      + outpost_arn                          = (known after apply)
      + password_data                        = (known after apply)
      + placement_group                      = (known after apply)
      + placement_partition_number           = (known after apply)
      + primary_network_interface_id         = (known after apply)
      + private_dns                          = (known after apply)
      + private_ip                           = (known after apply)
      + public_dns                           = (known after apply)
      + public_ip                            = (known after apply)
      + secondary_private_ips                = (known after apply)
      + security_groups                      = (known after apply)
      + source_dest_check                    = true
      + subnet_id                            = (known after apply)
      + tags_all                             = (known after apply)
      + tenancy                              = (known after apply)
      + user_data                            = (known after apply)
      + user_data_base64                     = (known after apply)
      + user_data_replace_on_change          = false
      + vpc_security_group_ids               = (known after apply)

      + capacity_reservation_specification {
          + capacity_reservation_preference = (known after apply)

          + capacity_reservation_target {
              + capacity_reservation_id                 = (known after apply)
              + capacity_reservation_resource_group_arn = (known after apply)
            }
        }

      + ebs_block_device {
          + delete_on_termination = (known after apply)
          + device_name           = (known after apply)
          + encrypted             = (known after apply)
          + iops                  = (known after apply)
          + kms_key_id            = (known after apply)
          + snapshot_id           = (known after apply)
          + tags                  = (known after apply)
          + throughput            = (known after apply)
          + volume_id             = (known after apply)
          + volume_size           = (known after apply)
          + volume_type           = (known after apply)
        }

      + enclave_options {
          + enabled = (known after apply)
        }

      + ephemeral_block_device {
          + device_name  = (known after apply)
          + no_device    = (known after apply)
          + virtual_name = (known after apply)
        }

      + maintenance_options {
          + auto_recovery = (known after apply)
        }

      + metadata_options {
          + http_endpoint               = (known after apply)
          + http_put_response_hop_limit = (known after apply)
          + http_tokens                 = (known after apply)
          + instance_metadata_tags      = (known after apply)
        }

      + network_interface {
          + delete_on_termination = (known after apply)
          + device_index          = (known after apply)
          + network_card_index    = (known after apply)
          + network_interface_id  = (known after apply)
        }

      + root_block_device {
          + delete_on_termination = (known after apply)
          + device_name           = (known after apply)
          + encrypted             = (known after apply)
          + iops                  = (known after apply)
          + kms_key_id            = (known after apply)
          + tags                  = (known after apply)
          + throughput            = (known after apply)
          + volume_id             = (known after apply)
          + volume_size           = (known after apply)
          + volume_type           = (known after apply)
        }
    }

Plan: 1 to add, 0 to change, 0 to destroy.

Do you want to perform these actions?
  Terraform will perform the actions described above.
  Only 'yes' will be accepted to approve.

  Enter a value: yes

aws_instance.web: Creating...
aws_instance.web: Still creating... [10s elapsed]
aws_instance.web: Still creating... [20s elapsed]
aws_instance.web: Still creating... [30s elapsed]
aws_instance.web: Creation complete after 33s [id=i-07444b4cc6f1ba1ec]

Apply complete! Resources: 1 added, 0 changed, 0 destroyed.
We have confirmation that the EC2 instance was applied (created)! If you check the AWS console, you should see that a new EC2 instance is initializing or is already running.

Now check the contents of the current folder. You should notice and new file called terraform.tfstate. This file contains very important information about the created instance like ID, public and private IP address, etc. This file is also needed to keep track of all instances that are created and avoid duplication when terraform apply is re-run.
$ tree -a
.
├── main.tf
├── .terraform
│   └── providers
│       └── registry.terraform.io
│           └── hashicorp
│               └── aws
│                   └── 4.12.1
│                       └── linux_amd64
│                           └── terraform-provider-aws_v4.12.1_x5
├── .terraform.lock.hcl
└── terraform.tfstate
The contents of the file looks like this:
$ cat terraform.tfstate
{
  "version": 4,
  "terraform_version": "1.1.9",
  "serial": 1,
  "lineage": "25a2dd58-7314-c245-68be-a0a6faaa8040",
  "outputs": {},
  "resources": [
    {
      "mode": "managed",
      "type": "aws_instance",
      "name": "web",
      "provider": "provider[\"registry.terraform.io/hashicorp/aws\"]",
      "instances": [
        {
          "schema_version": 1,
          "attributes": {
            "ami": "ami-0f9fc25dd2506cf6d",
            "arn": "arn:aws:ec2:us-east-1:539820127661:instance/i-07444b4cc6f1ba1ec",
            "associate_public_ip_address": true,
            "availability_zone": "us-east-1d",
            "capacity_reservation_specification": [
              {
                "capacity_reservation_preference": "open",
                "capacity_reservation_target": []
              }
            ],
            "cpu_core_count": 1,
            "cpu_threads_per_core": 1,
            "credit_specification": [
              {
                "cpu_credits": "standard"
              }
            ],
            "disable_api_termination": false,
            "ebs_block_device": [],
            "ebs_optimized": false,
            "enclave_options": [
              {
                "enabled": false
              }
            ],
            "ephemeral_block_device": [],
            "get_password_data": false,
            "hibernation": false,
            "host_id": null,
            "iam_instance_profile": "",
            "id": "i-07444b4cc6f1ba1ec",
            "instance_initiated_shutdown_behavior": "stop",
            "instance_state": "running",
            "instance_type": "t2.micro",
            "ipv6_address_count": 0,
            "ipv6_addresses": [],
            "key_name": "",
            "launch_template": [],
            "maintenance_options": [
              {
                "auto_recovery": "default"
              }
            ],
            "metadata_options": [
              {
                "http_endpoint": "enabled",
                "http_put_response_hop_limit": 1,
                "http_tokens": "optional",
                "instance_metadata_tags": "disabled"
              }
            ],
            "monitoring": false,
            "network_interface": [],
            "outpost_arn": "",
            "password_data": "",
            "placement_group": "",
            "placement_partition_number": null,
            "primary_network_interface_id": "eni-0b1cf92a4015692fb",
            "private_dns": "ip-172-31-20-148.ec2.internal",
            "private_ip": "172.31.20.148",
            "public_dns": "ec2-34-224-8-196.compute-1.amazonaws.com",
            "public_ip": "34.224.8.196",
            "root_block_device": [
              {
                "delete_on_termination": true,
                "device_name": "/dev/xvda",
                "encrypted": false,
                "iops": 100,
                "kms_key_id": "",
                "tags": {},
                "throughput": 0,
                "volume_id": "vol-09e874d0880106f61",
                "volume_size": 8,
                "volume_type": "gp2"
              }
            ],
            "secondary_private_ips": [],
            "security_groups": [
              "default"
            ],
            "source_dest_check": true,
            "subnet_id": "subnet-025110cd26f1d13e2",
            "tags": null,
            "tags_all": {},
            "tenancy": "default",
            "timeouts": null,
            "user_data": null,
            "user_data_base64": null,
            "user_data_replace_on_change": false,
            "volume_tags": null,
            "vpc_security_group_ids": [
              "sg-052bfa8aa0c6b58c2"
            ]
          },
          "sensitive_attributes": [],
          "private": "eyJlMmJmYjczMC1lY2FhLTExZTYtOGY4OC0zNDM2M2JjN2M0YzAiOnsiY3JlYXRlIjo2MDAwMDAwMDAwMDAsImRlbGV0ZSI6MTIwMDAwMDAwMDAwMCwidXBkYXRlIjo2MDAwMDAwMDAwMDB9LCJzY2hlbWFfdmVyc2lvbiI6IjEifQ=="
        }
      ]
    }
  ]
}
Let’s add another block type to our main.tf file for it to show us only the public IP address of the instance. For that, add following code to the end of the file.
output "instance_ip_pub_addr" {
  value = aws_instance.web.public_ip
}
The explanation of the above code is as follows; we are asking Terraform to output (return) us the public IP address (public_ip) from the AWS Instance (aws_instance) object labeled web.
At this point, if we re-run the terraform apply command we should see following result.
$ terraform apply
aws_instance.web: Refreshing state... [id=i-07444b4cc6f1ba1ec]

Note: Objects have changed outside of Terraform

Terraform detected the following changes made outside of Terraform since the last "terraform apply":

  # aws_instance.web has changed
  ~ resource "aws_instance" "web" {
        id                                   = "i-07444b4cc6f1ba1ec"
      + tags                                 = {}
        # (29 unchanged attributes hidden)


        # (6 unchanged blocks hidden)
    }


Unless you have made equivalent changes to your configuration, or ignored the relevant attributes using ignore_changes, the following plan
may include actions to undo or respond to these changes.

───────────────────────────────────────────────────────────────────────────────────────────────────────────────────────────────────────────

Changes to Outputs:
  + instance_ip_pub_addr = "34.224.8.196"

You can apply this plan to save these new output values to the Terraform state, without changing any real infrastructure.

Do you want to perform these actions?
  Terraform will perform the actions described above.
  Only 'yes' will be accepted to approve.

  Enter a value: yes


Apply complete! Resources: 0 added, 0 changed, 0 destroyed.

Outputs:

instance_ip_pub_addr = "34.224.8.196"
The final step that we have left is to destroy the instance with the terraform destroy command. When prompted type yes.
NOTE
Be very careful when running this command in the production environment, since it will destroy all resourceis that are present in theterraform.tfstatefile and the changes are irreversible! YOU HAVE BEEN WARNED!!!
$ terraform destroy
aws_instance.web: Refreshing state... [id=i-07444b4cc6f1ba1ec]

Terraform used the selected providers to generate the following execution plan. Resource actions are indicated with the following symbols:
  - destroy

Terraform will perform the following actions:

  # aws_instance.web will be destroyed
  - resource "aws_instance" "web" {
      - ami                                  = "ami-0f9fc25dd2506cf6d" -> null
      - arn                                  = "arn:aws:ec2:us-east-1:539820127661:instance/i-07444b4cc6f1ba1ec" -> null
      - associate_public_ip_address          = true -> null
      - availability_zone                    = "us-east-1d" -> null
      - cpu_core_count                       = 1 -> null
      - cpu_threads_per_core                 = 1 -> null
      - disable_api_termination              = false -> null
      - ebs_optimized                        = false -> null
      - get_password_data                    = false -> null
      - hibernation                          = false -> null
      - id                                   = "i-07444b4cc6f1ba1ec" -> null
      - instance_initiated_shutdown_behavior = "stop" -> null
      - instance_state                       = "running" -> null
      - instance_type                        = "t2.micro" -> null
      - ipv6_address_count                   = 0 -> null
      - ipv6_addresses                       = [] -> null
      - monitoring                           = false -> null
      - primary_network_interface_id         = "eni-0b1cf92a4015692fb" -> null
      - private_dns                          = "ip-172-31-20-148.ec2.internal" -> null
      - private_ip                           = "172.31.20.148" -> null
      - public_dns                           = "ec2-34-224-8-196.compute-1.amazonaws.com" -> null
      - public_ip                            = "34.224.8.196" -> null
      - secondary_private_ips                = [] -> null
      - security_groups                      = [
          - "default",
        ] -> null
      - source_dest_check                    = true -> null
      - subnet_id                            = "subnet-025110cd26f1d13e2" -> null
      - tags                                 = {} -> null
      - tags_all                             = {} -> null
      - tenancy                              = "default" -> null
      - user_data_replace_on_change          = false -> null
      - vpc_security_group_ids               = [
          - "sg-052bfa8aa0c6b58c2",
        ] -> null

      - capacity_reservation_specification {
          - capacity_reservation_preference = "open" -> null
        }

      - credit_specification {
          - cpu_credits = "standard" -> null
        }

      - enclave_options {
          - enabled = false -> null
        }

      - maintenance_options {
          - auto_recovery = "default" -> null
        }

      - metadata_options {
          - http_endpoint               = "enabled" -> null
          - http_put_response_hop_limit = 1 -> null
          - http_tokens                 = "optional" -> null
          - instance_metadata_tags      = "disabled" -> null
        }

      - root_block_device {
          - delete_on_termination = true -> null
          - device_name           = "/dev/xvda" -> null
          - encrypted             = false -> null
          - iops                  = 100 -> null
          - tags                  = {} -> null
          - throughput            = 0 -> null
          - volume_id             = "vol-09e874d0880106f61" -> null
          - volume_size           = 8 -> null
          - volume_type           = "gp2" -> null
        }
    }

Plan: 0 to add, 0 to change, 1 to destroy.

Changes to Outputs:
  - instance_ip_addr = "172.31.20.148" -> null

Do you really want to destroy all resources?
  Terraform will destroy all your managed infrastructure, as shown above.
  There is no undo. Only 'yes' will be accepted to confirm.

  Enter a value: yes

aws_instance.web: Destroying... [id=i-07444b4cc6f1ba1ec]
aws_instance.web: Still destroying... [id=i-07444b4cc6f1ba1ec, 10s elapsed]
aws_instance.web: Still destroying... [id=i-07444b4cc6f1ba1ec, 20s elapsed]
aws_instance.web: Still destroying... [id=i-07444b4cc6f1ba1ec, 30s elapsed]
aws_instance.web: Destruction complete after 30s

Destroy complete! Resources: 1 destroyed.
To confirm we can check the AWS Console page and see that the instance is actually terminated.

Conclusion
This was an introduction to Terraform. In next blog post I will cover more complex examples and advanced Terraform coding. Stay tuned!
Armen
GitHub: @armartirosyan
Twitter: @armartirosyan